Nginx configuration for WordPress
In this lesson we'll configure Nginx for WordPress. We'll bring the configs into our version-controlled repository, create a per-site server block with SSL/TLS, and make sure PHP and permalinks are working.

Global configuration
Nginx's configuration lives in /etc/nginx/ with the main file called
nginx.conf. This is the global configuration file which typically defines
the main, events and http contexts. This is where we can adjust things
like the number of Nginx workers and connections, global SSL and compression
settings.
# main context

events {
    # events context
}

http {
    # http context
}
A lot of settings in Nginx support multiple contexts. For example, compression
can be enabled globally in the http context, but then disabled for a specific
site in the server context, or even a specific location context.
The server context blocks go inside the http context, but instead of placing
them in the main configuration file, we can use separate files and include
them. If you read the main nginx.conf file, you'll see such includes toward
the end of the http context:
include /etc/nginx/conf.d/*.conf;
include /etc/nginx/sites-enabled/*;
Let's use this structure to our advantage to bring everything important into
our configs repository, and symlink back. By default Nginx will come with a
default site configuration, which displays the "Welcome to Nginx!" message.
We can disable it, but use it as a base to create our own config.
sudo mv /etc/nginx/nginx.conf /config/nginx/nginx.conf
sudo cp /etc/nginx/sites-available/default /config/nginx/uncached.org.conf

sudo rm /etc/nginx/sites-enabled/default
ln -sfn /config/nginx/nginx.conf /etc/nginx/nginx.conf
ln -sfn /config/nginx/uncached.org.conf /etc/nginx/sites-enabled/uncached.org.conf
Don't forget to commit and push these changes.
There's not much to tune in the global nginx.conf at this stage. Perhaps
the worker_processes directive might be one. That is usually set to auto,
which sets the number of processes to the number of CPU cores available on the
system.
While this is a good default, it doesn't take into account the fact that you'll also be running PHP workers and MySQL/MariaDB databases on the same system, so dialing it down to perhaps 50% of your capacity might be a good idea.
Per-site configuration
Per-site configuration comes in server blocks, which is what our
uncached.org.conf file will consist of. Let's start with a minimal
configuration, which will support PHP and permalinks in our future WordPress
install:
server {
    listen 443 ssl;
    server_name uncached.org www.uncached.org;

    root /sites/uncached.org/public_html;
    index index.php index.html;

    ssl_certificate /config/ssl/uncached.org.cert.pem;
    ssl_certificate_key /config/ssl/uncached.org.key.pem;

    location ~ /\. {
        deny all;
    }

    location ~ \.php$ {
        include snippets/fastcgi-php.conf;
        fastcgi_pass unix:/sites/uncached.org/php-fpm.sock;
    }

    location / {
        try_files $uri $uri/ /index.php?$args;
    }
}
Let's go through this minimal configuration line by line. First, we're using
the listen and server_name directives to tell Nginx this server block is
for the HTTPS port, and only use it if the server name matches the ones we
provided.
Next, using the root and index directives we tell Nginx where our public
files are, and what file it should look for if one has not been specified.
Then we have our ssl_certificate and ssl_certificate_key directives. These
tell Nginx where to look for the SSL/TLS certificate and key. We'll generate
these files shortly.
Finally, we have three location blocks. These allow you to set specific
settings and behavior, based on what the requested URL was. There are a few
ways Nginx does location matching, and I encourage you to read the
official docs
to better understand how it works, the processing order, etc.
Our first location block is a regular expression matching a . character
immediately preceded by a / character. This prevents visitors from accessing
potentially sensitive dot-files, such as .env, .git, .maintenance,
.htaccess, swap files, and more.
The next location block matches anything that ends in .php. Nginx packaged
for Ubuntu and other Debian-based systems includes a handy fastcgi-php.conf
snippet to configure FastCGI for PHP. The fastcgi_pass directive tells
Nginx which FastCGI socket to send this request to.
Our final location is a catch-all block, which uses the try_files directive
to tell Nginx which patterns/names to try and access in which order. As you can
see, the last fallback is /index.php. This makes pretty permalinks work in
WordPress, when requested paths don't exist on the filesystem.
HTTPS & TLS/SSL
We intentionally configure Nginx for HTTPS only, and we'll let Cloudflare (or your CDN provider of choice) handle any insecure HTTP traffic and redirects. However, this also means that we need a certificate and key to encrypt and serve this traffic.
In the next lesson we're going to obtain a proper origin certificate from
Cloudflare to cover our domains, but for now let's go ahead and generate a
self-signed certificate for testing using openssl:
sudo mkdir /config/ssl
sudo openssl req -x509 -newkey rsa:2048 -nodes -days 365 \
    -keyout /config/ssl/uncached.org.key.pem \
    -out /config/ssl/uncached.org.cert.pem \
    -subj "/CN=uncached.org"
This will create the two .pem files we referenced in our Nginx config.
Testing
It is always a good idea to test any updates to the configuration using
nginx -t before reloading Nginx:
sudo nginx -t
sudo systemctl reload nginx.service
To ensure our PHP configuration is also working as expected, let's create
an index.php file in our public_html directory with the following contents:
<?php
echo 'The time is: ' . time() . PHP_EOL;
Now let's use cURL to request this URL on the server:
curl -v --insecure -H "Host: uncached.org" https://127.0.0.1/test.php
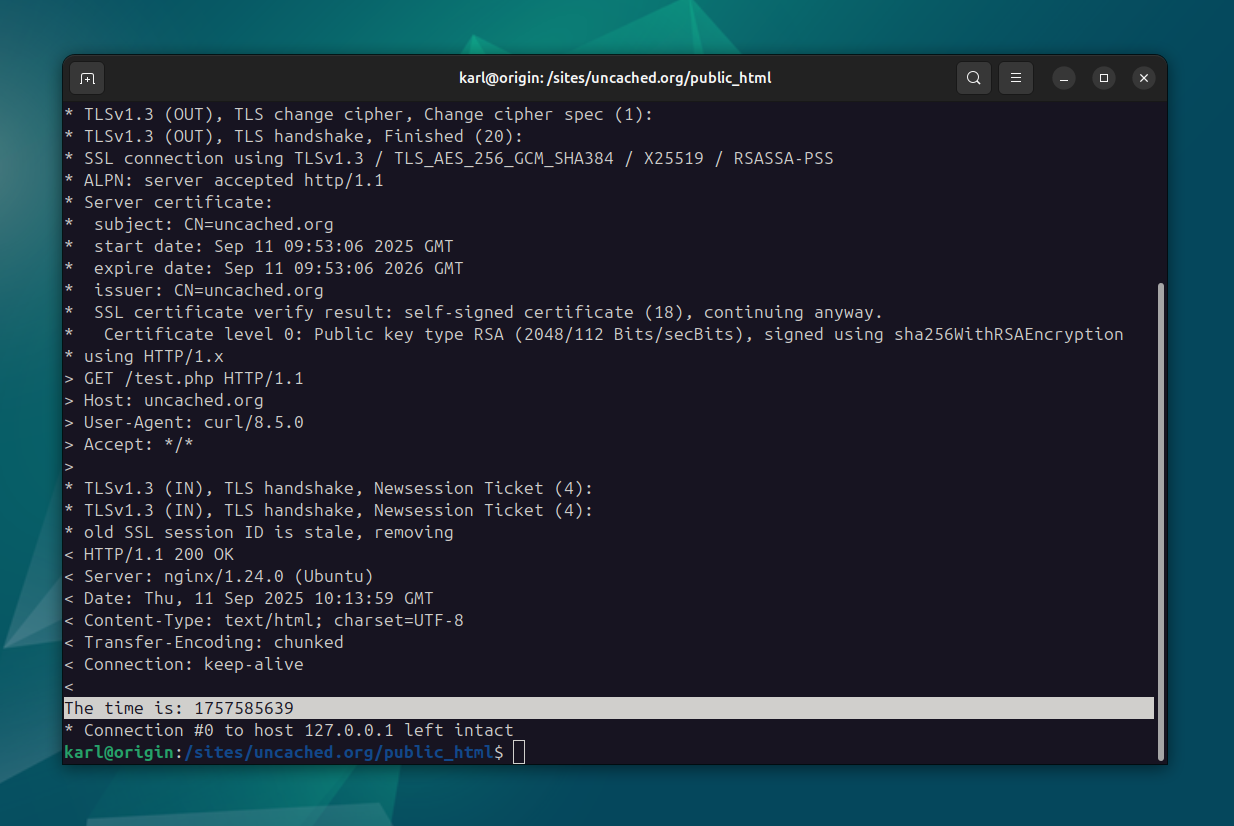
The -v flag makes the output verbose, so you can ensure that the correct
self-signed certificate is being served. The --insecure flag is required
because the certificate is not valid. The -H flag sends a Host header to
make sure Nginx matches our request to the correct server block.
In fact, you should be able to view this page over HTTPS in your browser as well:
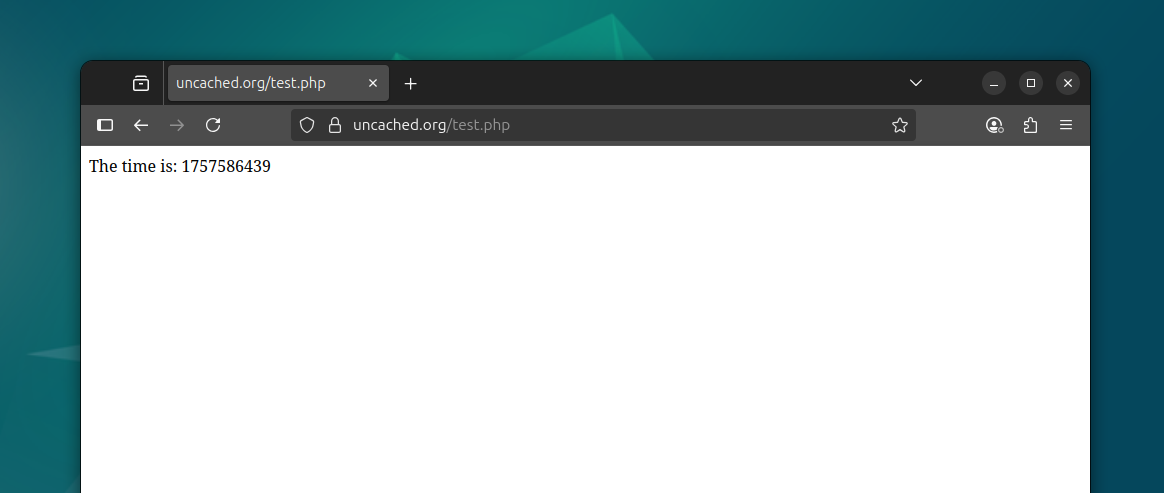
This works because the default Cloudflare settings are non-strict, meaning it will accept our self-signed certificate from the origin. We'll lock this down, configure a proper origin cert, HTTP to HTTPS redirects, and more in the next lesson.