Provisioning a VPS for WordPress with Cherry Servers
In this lesson I'm going to walk you through provisioning a VPS server with Cherry Servers, a bare metal cloud provider that also offers virtual machines, with plenty of sizing options, starting from as low as $4/mo.
Note: This course requires either a dedicated server or a VPS. If you're looking to provision a dedicated server, see Provisioning a dedicated server instead.

A virtual machine is a great way to test things out and do it quickly. I wouldn't recommend running anything in production on the entry-level 1 GB options, as you will very quickly run out of usable memory and get throttled on CPU, disk and network resources.
For a production-worthy WordPress site, I recommend at least 2 vCores with 2 GB of memory, which lands at around $8-9 monthly. This gives you some breathing room for one or a couple of sites.
Create a Cherry Servers account
If you're new to Cherry Servers, you can use this link to create an account
and hit the Sign up button on the top right. Note that this is an affiliate
link, which allows me to earn a small commission if you sign up. If you'd rather
sign up without using my affiliate link, go to www.cherryservers.com directly.
After signing up and verifying your email address, I recommend adding an SSH key to your account. This will allow you to assign that key to new instances, so you won't have to juggle any passwords. Hit the user avatar on the top right and select User - SSH keys, then click the Add button.
If you're new to SSH keys, I highly recommend GitHub's guide on generating keys and managing the SSH agent.
I also recommend updating your billing details at this point and adding a new card or topping up your balance to avoid any surprises. Note that even with promotional credits, you will still need a working payment method to actually launch an instance.
Deploy a new server
Hit the New instance button at the top to get to the Deploy New Server screen. The first thing to pick here is the type of server you want, and since we're after a virtual machine, we'll be looking at the Virtual Servers group on the left.
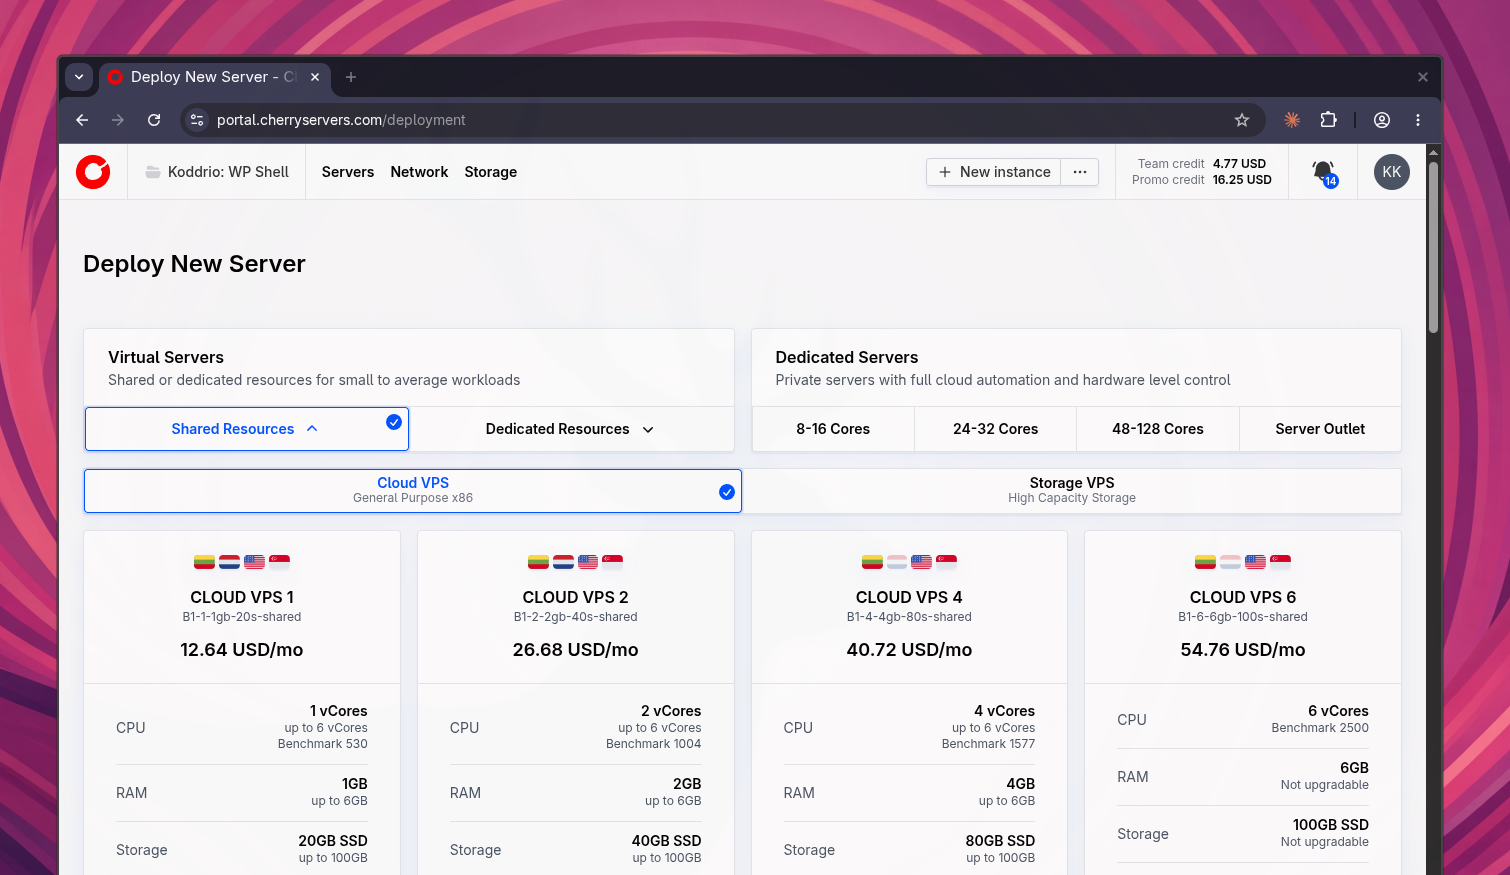
Virtual servers come with either Shared Resources or Dedicated Resources, and each of those splits further into Cloud VPS for general purpose workloads and Storage VPS for high capacity storage. For a WordPress site we want a general purpose machine, so select Shared Resources and then Cloud VPS.
The plans are named after their vCore count, so Cloud VPS 2 gets you 2 vCores with 2 GB of memory and a 40 GB SSD, while Cloud VPS 6 gets you 6 vCores with 6 GB of memory and 100 GB of storage. Most plans can be upgraded later, up to 6 vCores, 6 GB of memory and 100 GB of storage.
I'm going to go with the Cloud VPS 2 (Gen 2) plan for this course, which is plenty for a WordPress site or two. Do keep an eye on the price shown on the plan cards, as it depends on the billing period you pick: hourly billing is convenient for testing different specs, but a monthly commitment costs significantly less for a server you intend to keep running.
Each plan also lists a benchmark score, which is handy for comparing plans within the same family. Don't read too much into these numbers for now, we'll run actual benchmarks against real WordPress workloads in the performance module.
Dedicated resources
You might be tempted to go for the Dedicated Resources option, and you're more than welcome to give it a try. These instances will certainly outperform shared ones, simply because they essentially have VIP access to the underlying physical CPU cores, instead of competing for them with other tenants.
However, once you're paying that kind of money for a virtual machine, it's worth looking at a dedicated server instead. For the price of a mid-range dedicated-resource VPS you can often find an entry-level bare metal machine in the server outlet, with physical cores, plenty of RAM and local NVMe storage.
Region
After picking a plan you'll be asked to select a Region. Cherry Servers has a solid presence in Europe, Americas and APAC, and each region shows how many instances of your selected plan are currently in stock.
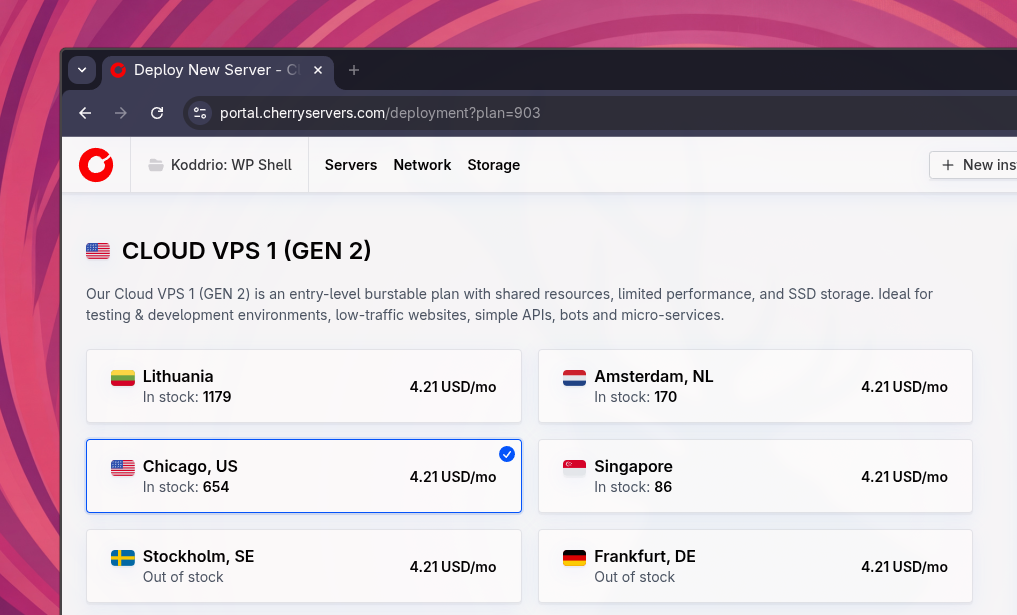
For testing things out, I usually select the region closest to me, giving me better connectivity and lower latency while I work. However, for live websites it's important to consider the target audience location, especially for highly dynamic websites, such as WooCommerce stores or LMS projects.
Note that a region being out of stock for one plan doesn't mean it's out of stock for all of them, so if you have your heart set on a specific location, it's worth checking a neighbouring plan size too.
OS image
Next, under Software, you will be asked to select the OS image to install on your new instance.
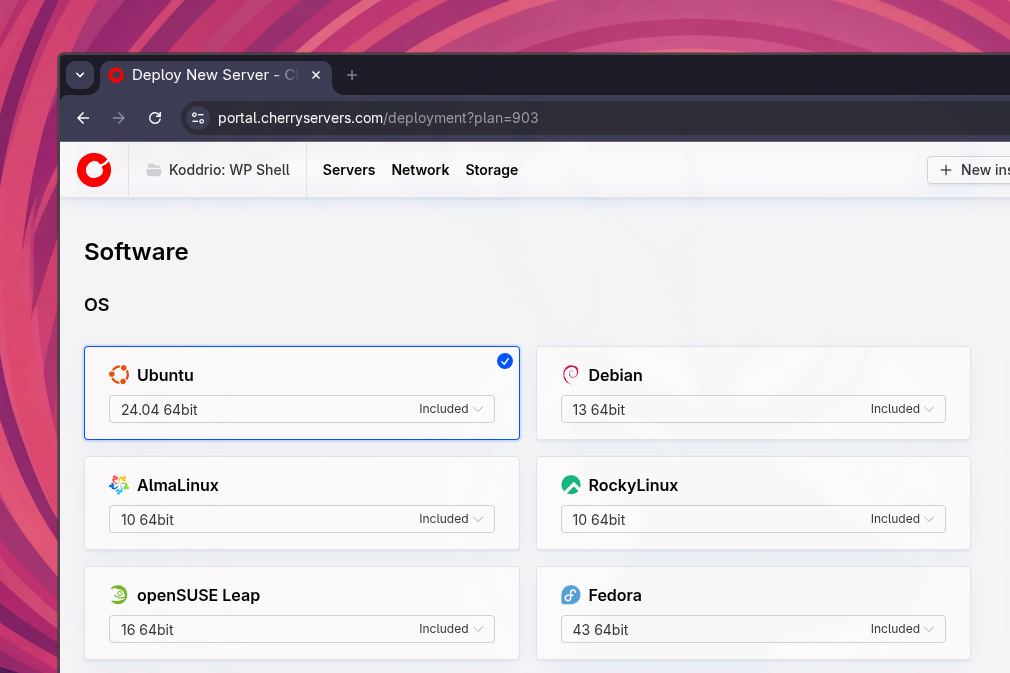
I'm going to select Ubuntu 24.04 64bit, but you can choose another flavor or version if you have a different preference. All of the listed images are included in the price, and you can always reinstall later with the Actions - Rebuild option.
Hostname and SSH keys
Further down you'll find the Backup storage option, which is a decoupled file storage space for data recovery. We're going to leave this at None, as we'll be setting up both on-site and off-site backups ourselves in a future module.
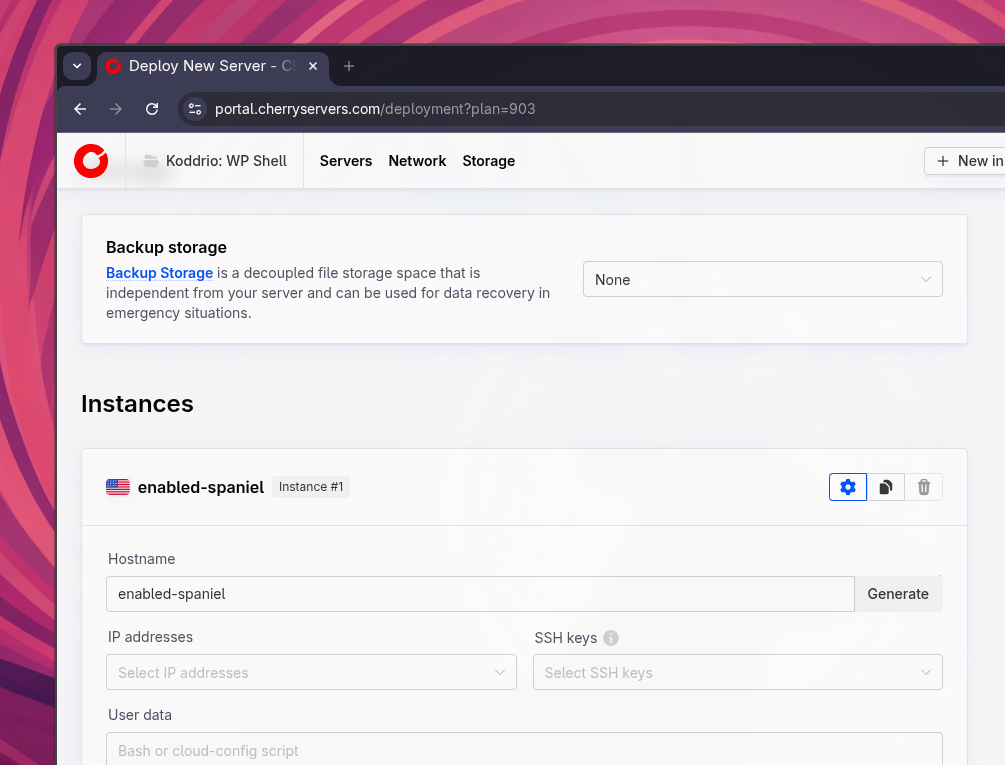
In the Instances section you can give your new server a descriptive hostname, or hit Generate for a random one. This is also where you assign the SSH keys you added to your account earlier. We're going to add two-factor authentication to our server in another lesson, but for now SSH key access will suffice.
Feel free to ignore the IP addresses and User data fields, we won't need either at this stage. Make sure you're provisioning only one instance, select your billing preference on the right, and hit the Deploy Now button to launch your new VM. It usually takes a couple of minutes to provision.
IP address
Once the virtual machine is provisioned, it'll be assigned a public IP address.
You can find this address next to the server name at the top of the server
details page, as well as under Primary IP in the Network section on the
right. The IP address assigned to my instance is 84.32.97.186 (yours will be
different).
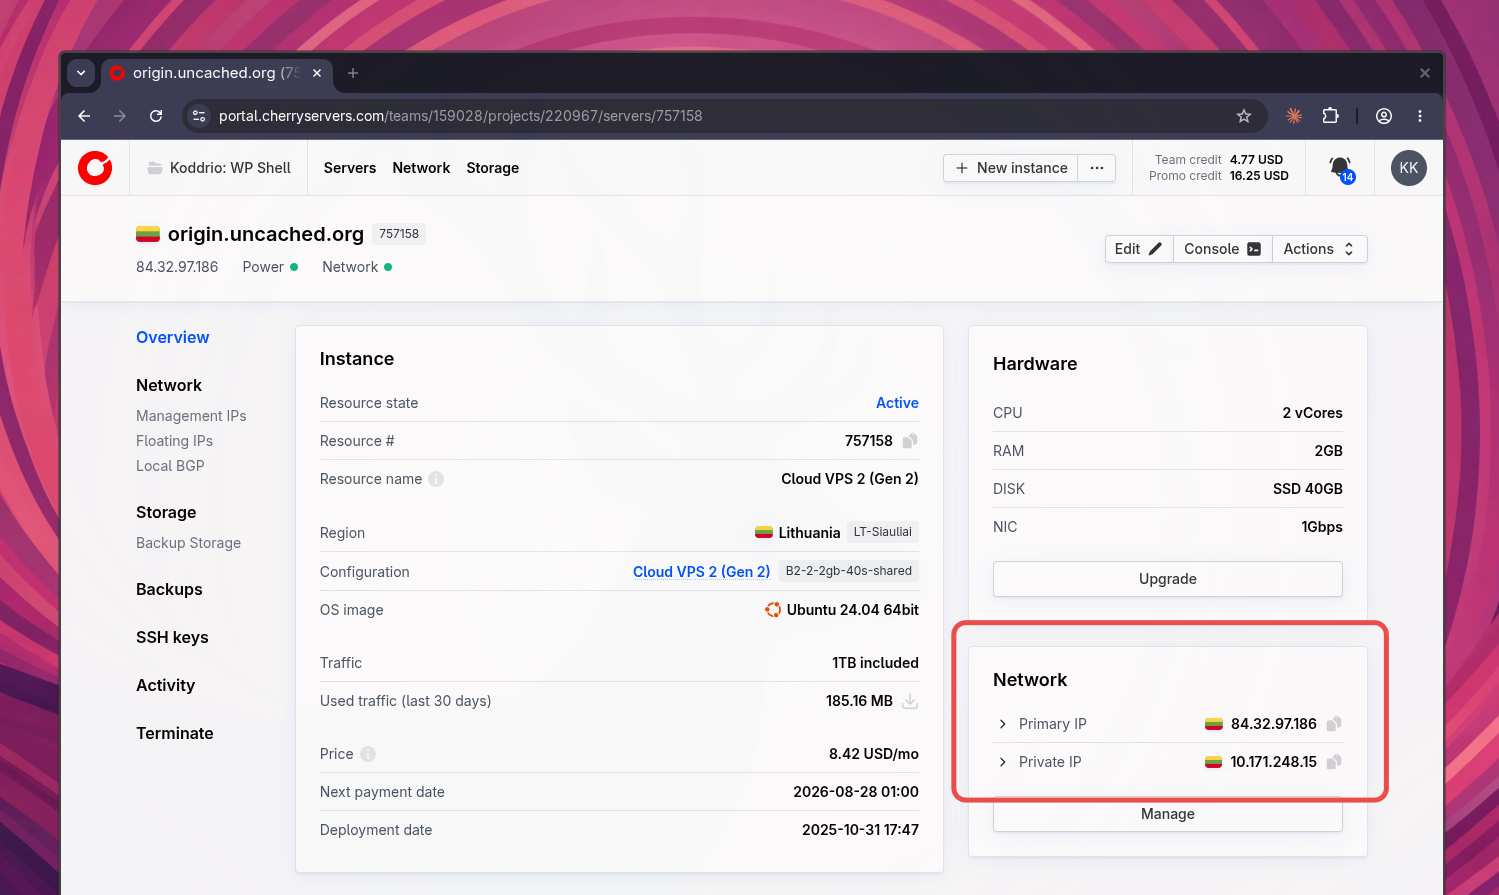
This page is also a good overview of what you actually got: the plan and its
hardware, the OS image, the amount of included traffic, and the price you're
paying for it. If you haven't assigned an SSH key, this is where you'll find
the root password and the remote console access details too.
When the server is up and running, you should be able to ping it by its
IP address:
ping 84.32.97.186
Make note of this IP address as we'll use it in a future lesson, when configuring DNS for our domain to point to this virtual machine so we can access SSH, HTTP and other services.
Note that you will be charged for this server, even if it's powered off. This is because the underlying resources are still being used (disk) or reserved (CPU and memory). If you do not intend to use this server, don't forget to terminate it to avoid charges.